airGuitarを作るairGuitar
airGuitarを作る
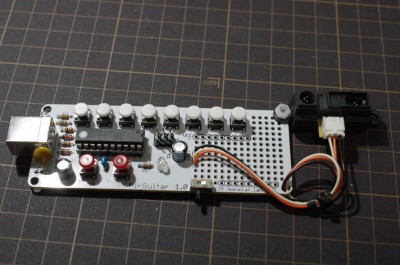
Monakaから派生したアプリケーションとしてairGuitarを作りました。
airGuitarはギター風の入力装置です。タクトスイッチでコードを選択して、弦を弾くように感覚でトリガを入れると、MIDIを出力します。
iPad, MacOSX, Windowsからは特別なドライバソフトのインストール不要で使えます。
airGuitar
IAs a variant of Monaka project, I designed a MIDI-input device named ‘airGuitar.’
As the name implies, it is a guitar like device; Tactile switches are used to choose one of chords, a distance-measuring sensor is used to trigger the virtual string. Note On/off signal of MIDI are generated and send to Personal Computers or iPad via USB-MIDI interface.
No extra driver is required for Windows XP or above, MacOSX, and iPads. I recommend GarageBand on iPad to use with airGuitar.
1. しくみ
airGuitarはタクトスイッチでコードを押さえ、距離センサでトリガを入力し、対応したMIDIコードをUSBで出力します。
基本はギターなので、ディフォルトで和音を出すようにしています。
回路的にはMonakaで作ったものを簡略化しています。Monakaで外部回路を使っていた部分をソフトウエア処理に変えました。
Monakaでは汎用性を重視して、外部に回路を設けて距離センサのアナログ出力を処理しています。
具体的には、外部ロジックで次の処理をしていました。
(1) 距離センサの出力をしきい値で切って入力あり/なしの信号にする
(2) 信号がばたつかないように、ワンショットマルチで一定時間のトリガをかける
専用のファームウエア内で、全てソフトウエアで処理するようにしました。また、パーツを減らすため以下の変更をしています。
(1) Tiny861の内部CR発振を使う。これによってクリスタルが不要になった。
これはPepperと同様の手法です。
(2) 割り切って、入力キーを減らす。
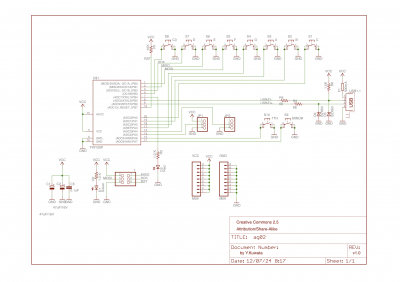
回路図を以下に示します。
2. 組み立て
専用基板を利用すれば組み立ては簡単です。自分で組み立てる場合には、キーの配置を工夫すると良いと思います。
パーツリストを以下に示します。
| 名称 | 型番 | 数量 | 備考 |
| CPU | Tiny861 | 1 | 専用プログラムの書き込みが必要 |
| ICソケット | 20PIN | 1 | |
| 距離センサ | GP2Y0A21YK0F | 1 | 取り付けに工夫が必要 |
| USB Bコネクタ | 基板取り付け用 | 1 | |
| タクトスイッチ | 6mm x 6mm | 10 | |
| LED | 赤、緑 | 2 | 色は自由 |
| 抵抗 | 1Kオーム 1/6W | 2 | LEDによって明るさを調整(820Ωなど) |
| 抵抗 | 75オーム 1/6W | 2 | |
| 抵抗 | 1.5Kオーム 1/6W | 1 | |
| 抵抗 | 10Kオーム 1/6W | 1 | |
| 積層セラミックコンデンサ | 0.1uF | 1 | |
| 電解コンデンサ | 100uF / 16V | 2 | |
| ツェナーダイオード | 3.6V | 2 | |
| ポリスイッチ | 500mA | 1 | 省略可能 |
| 基板 | 専用基板 | 1 | ユニバーサル基板でも作成可能 |
なお、基板単体で試す場合には、このページの最初の写真のように距離センサを基板の穴に仮止めすると便利です。
3. 使い方
iPadやパソコンにつなぐだけで、USB-MIDIデバイスとして認識されます。
そのままDTMソフトから使えます。
距離センサの感度(感知する距離)などはMIDI経由で制御可能です。専用ソフトを作成予定。
4. ダウンロード
ファームウエアはこちら (2012/8/28更新)
自分でファームウエアを書く場合には、HEXという名称のフォルダに入っているファイルを書き込んだ上で、ヒューズビットを以下のように設定して下さい。
FUSEH = 0xcd
FUSEL = 0xe1
(了)
1. How it works
Tactile switches are used to choose a chord in airGuitar, then the chord is triggered by the movement of virtual string, which is captured by distance sensor. airGuitar generate s sequence of MIDI note to PC via USB-MIDI. As the device is a kind of guitar, it generate a chord, not one note, as default setting.
The schematic of airGuitar is similar to that of ‘Monaka’ project. I made airGuitar simple in order to reduce the number of parts used. In Monaka, the following function is implemented as hardware logic circuit, as Monaka is not designed not just for guitar like device in mind.
(1) For the handling of analog reading of distance sensor, a comparator is used to decide whether trigger is exist or not
(2) To reduce glitch of trigger, an one-shot multi vibrator circuit with a fixed time constant is used.
The functions above is implemented as software within airGuitar firmware. To reduce the number of parts further, the following changes are applied.
(1) RC oscillator inside Tiny861 is used instead of external Cristal oscillator
This technique is also used in Pepper project which make use of Tiny 45/ Tiny85
(2) Reduce the number of switch for chord to simplify the device
As the results, the following schematic is used for airGuitar.
2. Assemble
It is very easy to assemble airGuitar, as I designed PCB for airGuitar. If you want to design your own PCB, or use Universal PCB, please make sure to assign the tactile switch in order.
The following table shows the bill of materials.
| Nane | Specification | Number | Notes |
| CPU | Tiny861 | 1 | firmware must be programmed |
| IC socket | 20PIN | 1 | |
| distant measuring sensor | GP2Y0A21YK0F | 1 | need a screw to attach PCB |
| USB B connector | for PCB | 1 | |
| tactile switch | 6mm x 6mm | 10 | |
| LED | red, green | 2 | any color will do |
| register | 1K ohm, 1/6W | 2 | must adjust for brightness of LED |
| register | 75 ohm 1/6W | 2 | |
| register | 1.5K ohm 1/6W | 1 | |
| register | 10K ohm 1/6W | 1 | |
| ceramic capacitor | 0.1uF | 1 | |
| chemical capacitor | 100uF / 16V | 2 | |
| Zener diode | 3.6V | 2 | |
| poly switch | 500mA | 1 | for the protection of USB port |
| PCB | airGuitar | 1 |
When used with PCB, distance measuring sensor should screwed to PCB.
3. How to use
airGuitar works as USB-MIDI device attached to PC or iPad, without extra software drivers. You can play it with your favorite Desk Top Music (DTM) software.
The sensibility of distance measuring sensor is adjustable via USB-MIDI. I’m planning to make a program to adjust the sensibility.
4. Download the firmware
The source code of firmware is here.
When you want to program Tiny861 by yourself, you can find binary file under the folder named ‘HEX’ in the archive. You also need to re-program fuse bit of Tiny861 to the following values. Consult the manual of your programmer in details.
FUSEH = 0xcd
FUSEL = 0xe1
(EOF)

