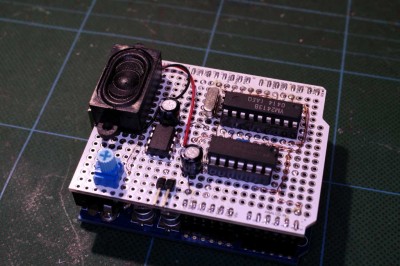
Midi Firmware for Arduino Uno (Moco)
Midi Firmware for Arduino Uno (Moco)
1. はじめに
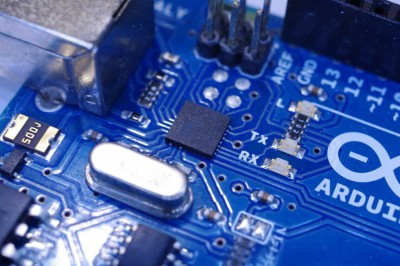
2010年に発表されたArduino UNOは、USBまわりの設計が変更されました。
これまではUSB専用のチップが採用されていましたが、Unoでは汎用的なマイクロプロセッサに変更になりました。この変更によって、USB処理の柔軟性を増すことが出来るようになりました。
これまではUSB-シリアル変換処理を行う専用チップであるFTDI 社FT232RLによって、パソコン側はシリアルポートとして処理を行っていました。UnoでUSB処理用に新しくAtmel社のMega8U2(or 16U2)が導入されました。Mega8U2はこれまでと同様にシリアルポートの処理を行うようにプログラムさせています。しかし、Mega8U2/16U2のプログラムを変更する(ファームウエアを入れ替える)ことによって、例えばマウスやキーボードなどのHuman Interface Device(HID)などの処理を行うことが出来るようになります。
MocoはMega8U2用のMIDIファームウエアです。MocoをMega8U2/16U2のファームウエアと入れ替えることによって、パソコン側からはUSB-MIDI(Standard Midi Class)として認識されます。楽器を作る場合には最適です。
Mocoを使って作成したStandard Midi ClassのデバイスはWindowsやMacOSXでドライバが不要です。また。iPadで標準的に認識されます。
2. Mocoの動作原理
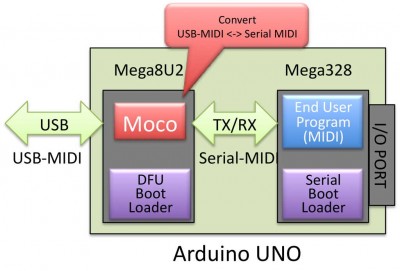
MocoはUSB-MIDIとシリアルMIDIの双方向の変換をするプログラムです。ArduinoのメインCPU側からはシリアルMIDIプロトコルを送受信します。パソコン側(USB側)はUSB-MIDIを送受信します。
Arduinoのメインプログラム側からは普通にMIDIの処理を行うだけで、パソコン側にUSB-MIDIとして認識されます。ArduinoのMIDIライブラリを使ったプログラムであればMocoを使うだけで、USB-MIDIデバイスを作ることができます。
Arduino でMIDIデバイスを開発する場合Arduino MIDI Libraryが使われます。MocoはAMLと互換性があります。
MocoはUSBの処理にLUFAを利用しています。
3. 開発の流れ NEW
dualMocoLUFAになって、デバイスの開発は比較的シンプルになりました。
具体的な手順は次の通りです。
1. DFUプログラムまたはISPによってMega8U2/16U2のファームウエアを入れ替えます。
2. Arduino-Serial モードでmega328のプログラムを書き込む
8u2のICSPコネクタのPIN4とPIN6をジャンパピンでつないでUnoをUSBに差し込むと、Arduino-Serialモードで動作します。
この状態で、Arduino IDEからUSB経由でプログラムできます。
3. USB-MIDIで動作の確認を行う
ジャンパピンを外して、UnoをUSBに差し込むとUSB-MIDIデバイスとして動作します。この状態でUSB-MIDIで動作の確認が出来ます。
プログラムに不具合がある場合には2に戻って再度Arduino IDEからmega328のプログラムを変更します。
4. アプリケーション例
(1) PSGシールド
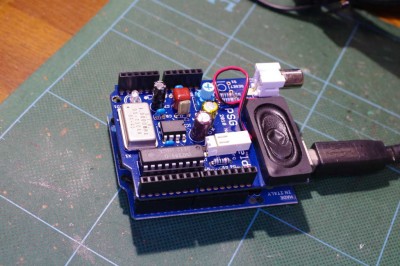
GeniesさんとHKHacksさんの設計によるPSG Shieldはそのまま動作します。
Mega328にはオリジナルのファームウエアを入れて下さい。8U2のファームをMocoにするだけでPCからUSB直結でそのままPSG音源を鳴らすことが出来ます。
(2) FM音源シールド
OPLL(FM音源)用のシールドを開発中です。これもMocoで動作させる予定。
以下はMocoを使っているプロジェクトです。
(3) USB midi controller (Theremin style) on Arduino Uno
http://baldwisdom.com/usb-midi-controller-theremin-style-on-arduino-uno/
(4) AirHarp
http://www.airharp.com/
(5) DJ Shield 2 for arduino
http://www.dm9records.com/index.php/release/dj-shield2/
(6) USB MIDI interface for Raspberry Pi Controller
http://rpc.gehennom.org/2013/03/usb-midi-interface/
(7) A DIY Arduino MIDI Controller with Purpleheart
http://jazarimusic.com/finally-a-diy-midi-controller-with-purpleheart/
(8) Arduinoで作るMIDIコン @tadfmac さん
5. ダウンロード
Githubに移行しました。こちらを参照下さい。 !! UPDATED 2015/04/11
6. 終わりに
Arduinoばかりではなく、Adafruitの32u4ブレークアウトボードなどを利用して普通のUSB-MIDI<->USB-Serialのブリッジとして利用可能です。
また、Moco を使った汎用のMIDI I/OモジュールとしてMonakaも計画しています。
Dm9 Recordsさんがファームウエアの書き換え方法を公開してしています。
http://www.dm9records.com/index.php/tips/arduino/moco/
UPDATED 2012/12/28
Midi Firmware for Arduino Uno (Moco)
1. Introduction
The design of the internal USB process on Arduino was changed since Arduino Uno in 2010.
Before Uno, Arduino Duemilanove for example, an special purpose chip is used to convert USB to serial. On Arduino Uno, the chip is replaced by a general purpose CPU with USB peripheral circuit. With this change, the users of Arduino got ability to reprogram the chip.
FTDI’s FT232R chip is used for Arduino Duemilanove to process USB communication with PC. Atmel’s Mega8U2(or 16U2) is introduced on Arduino Uno. By default, Mega8U2/16U2 is program to act just like FT232RL. By reprogramming Mega8U2/16U2, we can change Arduino Uno to act as Human Interface Device(HID), like mouse and keyboard, for example.
Moco is one of alternative firmware for Mega8U2/16U2. By replacing the original firmware on Mega8u2/16U2 with Moco, Arduino Uno will act as USB-MIDI device (Standard Midi Class), which is suitable to build music instruments and devices.
With Moco, you don’t need to install additional device drivers on Windows, MaxOSX, and linux, as Moco act as a device of Standard Midi Class. It will recognize as MIDI device on iPad without any additional software.
2. How Moco works
Moco is a bridge program which converts USB-MIDI packets to serial MIDI signal, and vice versa.
It will receive serial MIDI from Arduino’s main processor and send them to PC as USB-MIDI packet. It will receive USB-MIDI packets from PC and send them to Arduino’s main CPU as serial MIDI signal.
Your program on Arduino’s main processor is just need to act as serial MIDI device. Moco takes care of USB-MIDI process to communicate with PC. In other words, you need to write a program with MIDI library, you can build USB-MIDI device.
In many cased, Arduino MIDI Library is used for the development of MIDI device for Arduino MIDI. Moco is compatible with Arduino MIDI library.
Moco is based on LUFA as USB stack.
3. How to develop applications for Arduino Uno NEW!
It will be a little complicated process to the develop devices with Moco. This is because one need to go back and forth between the original firmware and Uno in development process.
In order to write a program to Mega328, the original firmware for Mega8u2/16U2 is required. On the other hand, Moco is required to test the program on USB-MIDI environment .
The following steps describe the details of the development process which I recommend.
1. Install dualMocoLUFA firmware to Mega8u2/16U2
In this step, I recommend to debug with serial MIDI environment, as you cannot use USB-MIDI at this point.
You need to use DFU programmer , or ISP, for the replacement. The following page describe the former method in details.
http://arduino.cc/en/Hacking/DFUProgramming8U2
2. Write your program with Arduino IDE
Before connect Uno to PC, install a jumper between pin4 and pin6 on ICSP connector for Mega8u2/16U2. With the jumper, Arduino-serial mode is initiated. You can use Arduino IDE to program mega328 on Uno.
3. Try your program with USB-MIDI firmware
Disconnect Uno and remove the jumper, then connect Uno again. This will initiate USB-MIDI bridge mode of dualMocoLUFA. At this step, you can verify the device works as USB-MIDI. At this time, you can try your application as USB-MIDI device .
If sometings goes wrong, back to step 2 and modify your program.Follows the instructions described step2, then reprogram Mega328 with Arduino IDE.
4. Examples
(1) PSG shield
PSG shield which is designed by Genies-san and HKHacks-san, works on Arduino Uno with Moco firmware.
For Mega328, you need to install original firmware supplied for PSG shield. For Mega8U2/16U2, you need to install Moco. You are ready to drive PSG shield from PC only with a USB cable.
(2) FM (OPLL) shield
FM (OPLL) shield is under development. This shield will make use of Moco.
Note the following examples are known to use Moco for the implementation of USB-MIDI on Arduino Uno.
(3) USB midi controller (Theremin style) on Arduino Uno
http://baldwisdom.com/usb-midi-controller-theremin-style-on-arduino-uno/
(4) AirHarp
http://www.airharp.com/
(5) DJ Shield 2 for arduino
http://www.dm9records.com/index.php/release/dj-shield2/
(6) USB MIDI interface for Raspberry Pi Controller
http://rpc.gehennom.org/2013/03/usb-midi-interface/
(7) A DIY Arduino MIDI Controller with Purpleheart
http://jazarimusic.com/finally-a-diy-midi-controller-with-purpleheart/
(8) MIDI Controller built by Arduino by @tadfmac
5. Download
The latest file is in github UPDATE 2015/04/11
6. Final Notes and future works
Moco firmware can use as USB-MIDI <-> USB-Serial bridge with a 8u2 or 32u4 board, like Adafruit’s 32u4 breakout board.
I also plan to build a MIDI-based general platform, like Monaka, with Moco.
